
One and a half years ago, I chanced upon Python and Anaconda as a tool for Data Science (DS) while taking part in a Data Hackathon. The myriad of Python libraries underscored Python’s versatility as a toolkit for data science. Sadly, I didn’t possess the necessary skillset to utilize Python back then. Since then, I took online courses in Python and SQL, and gradually developed an interest in the field of DS. Seeking to expedite the transition into DS, I enrolled in the Data Science Immersive (DSI) program by General Assembly. The DSI is a 3 months intensive boot camp aimed at equipping students with basic data science knowledge and skillsets through experiential learning on a series of projects. In this article, I hope to share a few learning points as a beginner in DS through my capstone project on the classification of terrorist bombing attacks through motive (intel) text.
- Planning matters, but so does flexibility – For capstone, we are free to decide on the topic of choice. However, while we pitch our initial choice of topic and problem statement, what may not be immediately apparent is that the topic as a DS project needs to be supported by the availability of data. The dataset for my initial choice is unavailable until a week later (Kaggle competition). Heeding my instructor’s guidance, I researched through UCI and Kaggle data repositories before deciding on the Global Terrorism Dataset (GTD) on Kaggle. I chose this topic because 1) I wanted to revisit NLP techniques while doing something slightly different and 2) to explore the potential of Latent Dirichlet Allocation (LDA); an unsupervised NLP topic modelling, as a supervised learning input for classification.
- Try maintaining an overview of the modelling workflow – Having a visualization of the modelling workflow helps in project organization and ensures consistency in project delivery. This is all the more so when trying to balance catching up on the advanced topics while working on the capstone, amongst other tasks. **** It has also helped saved valuable time in translating one’s thought process on Machine Learning approaches into a format that can be communicated easily with the instructors and classmates. The time saved was used in model deployment, which also presented many surprises and learning opportunities. The modeling workflow, it has also helped in allocating time to revisit previous techniques and trying new things out (e.g. animation, image masking, topic model, model deployment). Let’s delve into the technical details!

Dataset & Exploratory Data Analysis (EDA)
There are several datasets relating to Global Terrorism available on Kaggle. For capstone, I used the dataset spanning 1970 to 2017. Due to the size of the dataset, I used Git Large File Storage to manage the pushing of files to Github. The dataset is encoded in ISO-8859–1 format, which one needs to specify for reading the file. Thankfully, this is among the few topics discussed on Kaggle. However, what if one comes across another format but is unsure of its encoding? This approach by Agnese Poikane-Puchok should come in handy. The dataset contains 181,691 entries and 135 variables describing the details of a particular terrorist incident. Being an NLP project, the main feature of interest is the motive text that described the context, perpetrator, goals, and source of information for any terrorist incident. I used spaCy to visualize the recognised entities and phrase structure within the motive texts. The consistency in phrasing helps build confidence in using it as input for text classification. It also showcased the importance of good data quality. Nevertheless, as the motive text is a feature that is introduced post-1997, only 32,521 entries have adequate textual data for text classification after data cleaning.

The other variables used in EDA helped provide an understanding of global terrorism trends from most active groups to most favoured forms of attack and underlying motivations of terror groups. The other visualizations and the rationale for the choice of variables for EDA can be accessed here (README: p03_dataclean_ed, Jupyter notebook: P5.0 Data Cleaning, EDA, Feature engineering.ipynb). Some of the visuals that are directly related to feature engineering for Text Classification are extracted for illustration here.

Inspired by the work of Hans Rosling, I explored using animation as a means of visualizing terrorist incidents from both spatial and temporal perspectives. I initially used ImageMagick for .gif generation but was unable to troubleshoot the technical issue (the generated .gif file self-deletes) and hence, fallback on third-party software for the .gif file. Visualising the proportion of various attack modes over the years, bombing remains the favored form of attack, accounting for ~50% of all attack modes.

Data Prep & Text Classifier Model Evaluation (Part 1)
I would build a classifier model that takes the motive text as input and outputs a binary classification (bomb or non-bomb attack). I featured engineered bombing attacks as the positive class and all other attacks as the negative class. The class is relatively balanced with bombing attacks at 48%. The data is split 80–20 into Train/Test data. The Train data is then further split 80–20 into the train and validate subsets. For the classifier models, I explored Logistic Regression and Naive Bayes models. The results (based on validate(hold out) data set) are summarized below. The Logistic Regression model is the better performing model based on Sensitivity (intent is to reduce false negatives, which is predicted non-bombing attacks when they are actual bombings) and ROC AUC.

Selecting the Logistic Regression model as the production model, I explored model tuning such as reviewing and removing words that lead to false-negative classifications and removing overlapping words. The results are summarized below.

Topic Modeling
Topic modeling and Topic classification are commonly used by businesses to derive insights (e.g. customer sentiment) from unstructured data. A little primer on the difference between the two:
- Topic modeling is an unsupervised machine learning method that analyzes text data and determines cluster words for a set of documents.
- Topic classification is a supervised machine learning method. The textual data is labeled beforehand so that the topic classifier can make classifications based on patterns learned from labeled data.
LDA is a topic modeling method. While it is useful in uncovering word clusters (topics) from documents, it wasn’t integrated with the text classifier model. The review and manual labeling of the data for topic classification is untenable due to the dataset. Also, I do not possess the necessary subject matter expertise to determine the potential topic that a given particular terrorist incident could belong to, based on the motive text.
LDA Output as Input to a Classification Problem
Marc Kelechava‘s article on using LDA topic models as classification model input served as an inspiration and provided valuable insights on how one might integrate topic models into a text classifier model. Behind every cluster of words for a topic, are the probability distributions of topics from each motive text entry. If a model trained on the topic distributions can generalize on unseen data, we can infer that the model has identified topics clusters (underlying motives in this context) that remain appliable to new unseen data.

These are my steps:
- Topic modeling using the Train data set.
- Find the optimum number of topics based on the Coherence score.
- Train the LDA model on Train data. The Topic Probability Distributions(TPD) are then used as feature vectors in the Logistic Regression model for binary classification (bomb vs. non-bomb attacks) on the validate(hold-out) data set.
- Use the trained LDA model to derive TPD from the test data.
- Run the Logistic Regression model on the TPD to see if the model generalizes.
One key step lies in the extraction of the feature vectors for the topics. In my case, the optimum number of topics is 41.
# Make train Vectors
train_vecs = []
for i in range(len(X_train)):
top_topics = lda_train.get_document_topics(traincorpus[i], minimum_probability=0.0)
topic_vec = [top_topics[i][1] for i in range(41)]
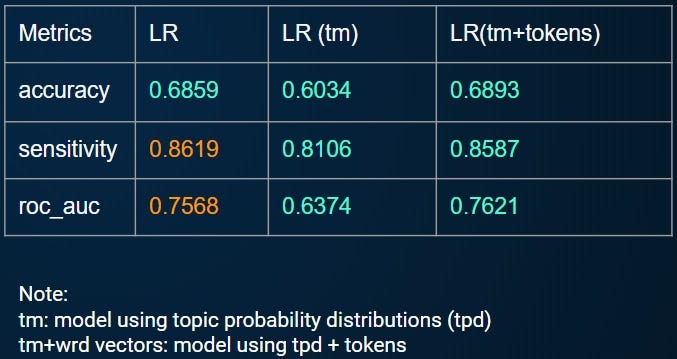
train_vecs.append(topic_vec)The model generalizes with a higher Sensitivity and ROC AUC on the test data set! The next question would naturally be "What would be the model performance if one combines the tokens from CountVectorizer and the TPD from LDA?"

Text Classifier Model Evaluation (Part 2)
As the output from CountVectorizer is a sparse matrix of token counts, one need to do some conversion to enable the joining of the LDA output. There are many ways to do so. This is what I did:
# Convert sparse matrix to dense
X_tr_dense = X_train_cleancv.toarray()
X_ts_dense = X_test_cleancv.toarray()
# add numpy array (train and test topic model vectors to dense matrix)
X_tr_dense_tm = np.concatenate((X_tr_dense,X_tr_vec),axis=1)
X_ts_dense_tm = np.concatenate((X_ts_dense,X_ts_vec),axis=1)from scipy.sparse import csr_matrix
# Convert back to sparse matrix for modeling
X_tr_sparse = csr_matrix(X_tr_dense_tm)
X_ts_sparse = csr_matrix(X_ts_dense_tm)After this, the model prediction is relatively straightforward. The comparison of the various approaches is summarized below. While the model using combined TPD and tokens didn’t perform as well as the one using CountVectorizer, it has potential.
Model Deployment
Heeding instructors’ encouragement to try model deployment, I jumped right into it. Model deployment can be an exciting venture and a hairy business at the same time, especially for a beginner like myself. For model deployment, I used Heroku. It is a Platform as a Service (PaaS) that enables developers to build, run, and operate applications in the cloud. The step-by-step walkthrough below outlines some of the discoveries along my learning journey. Hopefully, it would come in handy for those seeking to deploy their models. Follow along and tailor the code to suit your own project needs.
What is Needed Upfront
- Install Git (if you haven’t; chances are you have it installed by now)
- Install Heroku Command Line Interface
- Set up a Heroku account
- html page for your model (design can take significant time, so one may like to do this upfront first.) Note: I named it index.html
Consider how you want the deployed model to operate. For my capstone, the classifier model takes in a list of cleaned text, with custom stopwords removed. Upon the Instructor’s guidance, I pickle the CountVectorizer, custom stopwords, and the production model. In Jupyter:
import pickle
# save model to disk
filename1 = 'finalized_model.sav'
pickle.dump(model_lr2, open(filename1, 'wb'))
filename2 = 'finalized_cv.sav'
pickle.dump(cv2, open(filename2, 'wb'))
filename3 = 'finalized_stopwords.sav'
pickle.dump(s_words2, open(filename3, 'wb'))
Set Up Virtual Environment
To host your application (the model that you want to deploy), you will need flask and virtualenv as well. Install them using Anaconda Navigator or Anaconda prompt. Then set up a project directory space for hosting the project locally first. In my case, I already had the master directory for holding various projects, so the codes are slightly different. For my project needs, I created and named the virtual environment capstone. In Anaconda Prompt:
cd virtualenvs
virtualenv capstone
# activate env from Scripts folder
cd Scripts
activate.bat
# to deactivate
deactivate.bat
Install gunicorn (for Heroku), freeze the python modules for your environment like so:
pip install gunicorn
pip freeze >> requirements.txt
Depending on one’s project needs, one may consider configuring the requirements list. As I didn’t use a majority of the modules, I manually trimmed the packages down (to reduce deployment times downstream). Please refer to the requirements.txt file on Github for details.
Create an nltk.txt file in the root folder, populate it with the nltk modules used. This is for Heroku-python nltk use.
Flask script
Create a folder called templates to hold the html form.
mkdir templatesMove the index.html into this folder. Copy the pickle files into the root directory of the project virtualenv folder (i.e. capstone), hereafter termed as the root directory.
Python Script
Create python scripts in the root directory. These scripts are dependent on one’s model and functional flow. Refer to Requiredfn.py and service.py (where I hold the application model) on Github for more details.
Local Prototyping
To run the service, in Anaconda Prompt, enter the following sequentially. An URL should display where one may access the webpage and tune the webpage as needed in real-time.
SET FLASK_APP=service.py
SET FLASK_DEBUG=1
flask run
Heroku
Create a Procfile in the root directory (no extensions!). Procfile only needs one line. The filename is the name of the python script that contains the flask application with a flask name app.
# Within Procfile
web: gunicorn <filename>:<main method name>
# filename refers to the python script containing flask application with flask name app
# app = Flask(__name__)
# In this instance the line is
web: gunicorn service:app
Log in to Heroku, create the application and deploy like so using Anaconda Prompt
heroku login
heroku create
# two url returned will be returned, the latter is the Heroku git remote repo where the application lives # on Heroku. The former is the web url where the application will be once deployed.
git add .
git commit -m"message"
git push heroku master
# Ensure at least one instance of application is running
heroku ps:scale web=1
# Say hello to your application!
heroku open
Caveats
The currently deployed model is simplistic in the sense it accepts only a single input (the motive text). In actual operations, it is not expected that the classification of intelligence falls squarely on the model. For the deployed model’s input, I used an equal mix of motive texts related to both bombing and non-bombing attacks. Please head over to this site to try it out. Some may wonder why not create an input space for user input? Two considerations: 1) the current model set-up enables the linking of the entries to the ground-truth, and 2) considering the sensitivity of the subject matter, I would want to avoid gamification.
Wrap-up & Future Work
I hope this has been an informative read and is useful for your project needs. I intend on extending the capstone on the following areas soon:
- Explore the effects of additional features on model performance (feature-engineer spatial and temporal aspects such as attacks by region, attacks by decades).
- Explore the use of TFIDFVectorizer and spaCy. Similar to CountVectorizer, TFIDFVectorizer counts word frequencies but is inversely proportional to the frequency of the word in the corpus (collection of documents).
- Expand to Multi-class classifications.
The thought process on capstone topic selection to code for capstone and materials for model deployment is hosted on my GitHub here.
Thanks for reading!
Afternote (5Jul2020): I do recognize the generated .gif is somewhat small and hard to read, and am trying to figure out a way to maintain the resolution size of the generated .gif (world map animation). If you have an idea to do so, appreciate if you could suggest a way to do so. Thanks.


