Dive into MLOPS basics to improve your skills for designing, developing, and deploying computer vision projects for real-world, industrial applications
These days, we encounter (and maybe produce on our own) many Computer Vision projects, where AI is the hottest topic for new technologies. Fine-tuning a pre-trained image classification, object detection, or any other computer vision project is not a big deal. But what is the correct way of creating and deploying an AI project for industrial usage?
MLOps (Machine Learning Operations) is a set of practices, tools, and frameworks aimed at automating the development, deployment, monitoring, and management of machine learning models in production environments. It bridges the gap between the research and development environments and helps us improve both stages.
In this complete set of tutorials, we will be covering each step of a computer vision project’s MLOPS cycle.
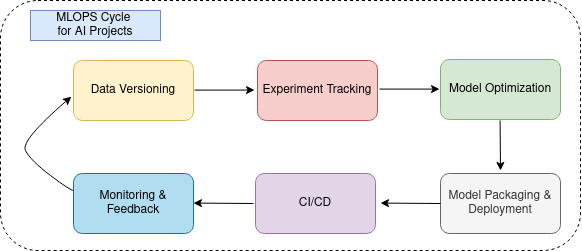
A complete cycle of MLOPS for an AI project is listed below, with an example tool that we will use to accomplish the related step:
- Data versioning & Management (Dvc)
- Experiment Tracking (MLFlow)
- Model Optimization (ONNX)
- Model Packaging & Serving (Docker)
- CI/CD for ML Pipelines (Git)
- Monitoring & Feedback Loops (Grafana)
In our tutorial, we will be examining all these steps over object detection or image classification models (sometimes for both)!
Let’s start directly here by discovering what is DVC, why we need it, and how we can use it easily!
Data versioning & Management (DVC)
Imagine you work on an industrial project, where you expect to have an updated version of the dataset regularly, i.e. a new product is added and you need to retrain your model to keep up with the newest objects that your AI model should detect.
To store the datasets in separate folders like dataset_v1, dataset_v2, …dataset_vx would be as awful as creating a new folder for our code updates and calling them project_v1, project_v2,… project_vx. Fortunately keeping track of our code and versioning is done by Git, a very common framework among developers. DVC comes to help us in the same of Git, this time to keep track of our datasets and version them without the need to create a new folder each time we update our dataset!
Therefore, at the end of this tutorial, we will learn how to convert our dataset environment from an unprofessional to an appropriate one shown as below figure:

Assuming that you have Git already initialized in your project folder, you can follow the steps below; otherwise, first, initialize a Git repository because DVC collaborates with Git to track your dataset!
Download and Initialize DVC (Linux)
Download DVC using the following command if you are a Linux user, if not find the correct command for yourself from the official repository.
snap install dvc --classicGo to your project environment and initialize DVC. We assume that your project structure is:
project
  |__ data
  |__ cfg
  |__ models
  |__ weights
  ...
So basically you have a main project folder and everything arranged
inside as subfolders, as well as the data folder
cd project
dvc initStart Versioning
Put your first version dataset into the "data/ " folder. In my case, it is called dataset_v2, since I have lost the dataset_v1 for this old project that I had only in my local.
mv dataset_v2/* data/Add this change to your DVC track history.
dvc add dataBe sure that Git also doesn’t track your data, it is totally unnecessary and bad usage of Git since it’s responsible for tracking the development code, not the datasets!
.gitignore

data/*
Add the DVC log to Git tracking, and also .gitignore since we have updated that and commit this change via git.
git add data.dvc .gitignore
git commit -m "dataset version 2"
Determine local storage to be the place where DVC will store the data in its format between the different versions. I named it "local_onedrive_remote" since in the next steps we will learn how to push or pull data between our Onedrive cloud storage.
dvc remote add -d local_onedrive_remote ~/dvc_onedrive_remoteTime to push our first dataset to our local storage!
dvc pushBefore going further to repeat these steps until we version all the datasets stored in different folders, we will take a look at how to keep this versioning in cloud storage. This is an important step if you want any backup, or collaborate with your colleagues over the cloud. Also, you could be able to pull the dataset with all the available versions from any other machine you need your dataset locally.

Rclone: a bridge between your local and remote storage
Rclone is a tool that helps to push and pull your data between local and remote paths. It becomes a bridge to fill the gap for finishing our data versioning pipeline.
Install Rclone into your local machine:
sudo apt update
sudo apt install rclone
Create a new Rclone configuration for your cloud storage, in my case it’s my personal Onedrive, but you can choose any type of cloud storage listed by Rclone:
rclone configClick n to create a new configuration, enter the name you want to give to the configuration and choose the type. For me, it’s 21 referencing Onedrive from the given list.
If everything is fine, you should be able to see your new storage by running rclone config command again:

Also, a double-check would be nice via rclone ls onedrive:/command to see if it starts listing all the contents in your remote storage so that you are sure the remote link is correct and mounted nicely in the storage object you call "onedrive" (or anything else you prefer for your personal cloud storage)
The last command for pushing the local storage versioning to our remote storage:
rclone sync ~/dvc_onedrive_remote onedrive:/DVC_STORAGE
What we do with this line is basically to synchronize our local storage (~/dvc_onedrive_remote) with the remote one (onedrive:/DVC_STORAGE), where onedrive is the selected name for the rclone remote repo while I configure it, and DVC_STORAGE is the folder I have created in my Onedrive to store my data.
That is all to set up our data versioning environment!
Now I will be applying the same commands to add the newer versions of my dataset into my versioning history and delete all the separated folders one by one.
The following bash script is useful to run after copy paste a newer version of the dataset folder (dataset_v3, dataset_v4,..) to complete all the additional steps at once.
#!/bin/bash

# Step 1: Automatically determine the dataset version
# Count previous commits containing "dataset version"
previous_version=$(git log --oneline | grep -c "dataset version")

# Increment the dataset version
new_version=$((previous_version + 1))

# Step 2: Add the dataset to DVC
echo "Adding dataset to DVC..."
dvc add data

# Step 3: Stage the updated DVC metadata
echo "Staging DVC metadata..."
git add data.dvc

# Step 4: Commit with the new dataset version
commit_message="dataset version $new_version"
echo "Committing with message: $commit_message"
git commit -m "$commit_message"

# Step 5: Push to DVC remote
echo "Pushing dataset to DVC remote..."
dvc push

# Step 6: Sync with OneDrive via Rclone
echo "Syncing DVC cache with OneDrive..."
rclone sync ~/dvc_onedrive_remote onedrive:/DVC_STORAGE

echo "Dataset version $new_version successfully pushed and synced!"
Now that everything is done and I have a dataset having 7 different versions in my DVC storage and only the last version in my project directory, it’s time to see how we can travel between different versions in case we need to use an older version of our dataset.
Pull an old version of the dataset
The current and newest dataset I have in my project folder seems like the below with 56 classes written in classes.txt, with 1072 training images, and 256 validation images.

Check the commit you need to go back for the specific version:
git log --oneline
Let’s say I need my dataset version 5, I choose 8f8de95 as the commit I want to go, and I pull the data from the DVC store back to my project folder.
git checkout 8f8de95
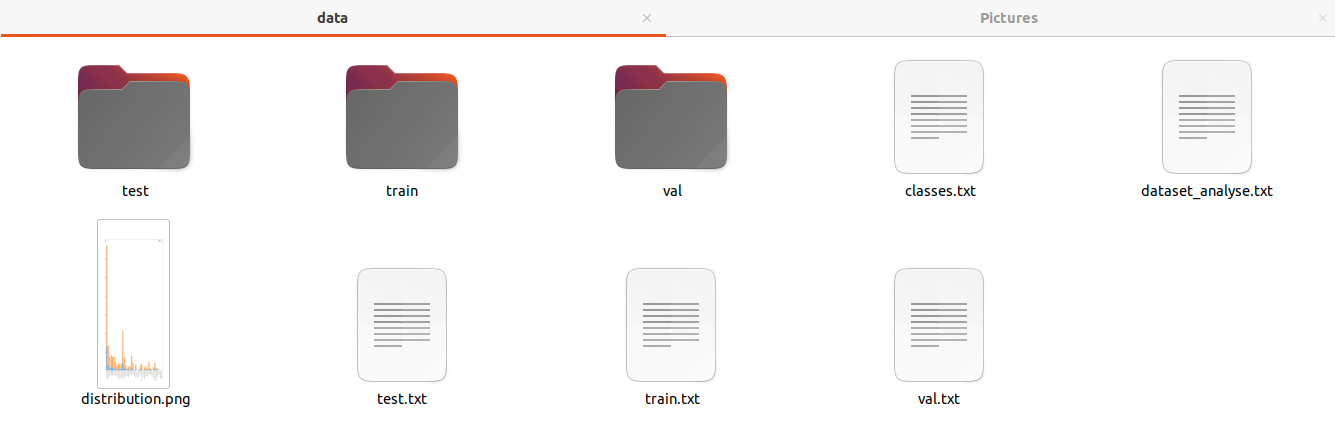
dvc pullNow the current dataset in my project folder looks as below, with 39 classes written in classes.txt, with 662 training and 152 validation images. I can see that even the distribution.png has been tracked by DVC and updated to the older one.
Get back to the newest dataset version
Let’s say we are done using the old dataset and want to go back to the latest version, two lines and we are done again!
git checkout master #or main according to your repo
dvc pull
Pull data from the cloud to a new machine
We use rclone sync ~/dvc_onedrive_remote onedrive:/DVC_STORAGE command to synchronize our local remote repo with the cloud remote repo. When we need the inverse (from remote to local), it’s just the inverse direction of the same command! So the command rclone sync onedrive:/DVC_STORAGE ~/dvc_onedrive_remote would synchronize the remote storage with our local one and can be used with any new machine you want to pull.
What if we have multiple datasets in the same project?
In real-world applications, you may have more than 1 subtask for the same project. For example, an object detection model and image classification model work in parallel or sequentially, which needs to be trained with different datasets. It is nothing more than arranging our project folder well and designing our DVC system accordingly:

Since now our main workplace contains multiple subtask folders as classification and detection, we rename data.dvc as _datadetection.dvc and take place in the root of our main folder, as well as creating a new one named _dataclassification.dvc.
Since we replace them, we should update the paths written in .dvc files also:

Repeating the previous steps, we configure the DVC for the classification subtask:
dvc add classification/data
git add data_classification.dvc
dvc remote add -d local_onedrive_remote_classification ~/dvc_onedrive_remote_classification
dvc push -r local_onedrive_remote_classification data_classification.dvc
rclone config # create a new cloud storage for classification dataset
rclone sync ~/dvc_onedrive_remote_classification onedrive:/DVC_STORAGE_CLASSIFICATION
That’s it! After arranging the workspace and adding new subtasks to the DVC system, updating the previous task’s .dvc files or paths if necessary, the rest is nothing but the same. The only thing you may give attention to is to run the correct command, for the correct dataset update. For example in our settings:
- If you have an update in the classification dataset:
dvc add classification/data
git add data_classification.dvc
dvc push -r local_onedrive_remote_classification data_classification.dvc
rclone sync ~/dvc_onedrive_remote_classification onedrive:/DVC_STORAGE_CLASSIFICATION- If you have an update in the detection dataset:
dvc add detection/data
git add data_detection.dvc
dvc push -r local_onedrive_remote data_detection.dvc
rclone sync ~/dvc_onedrive_remote onedrive:/DVC_STORAGE
We are done with the first step of the Mlops cycle for our project, to see the next steps after setting up the data versioning environment, keep up with the following contents of this tutorial!


